

How To Change Resolution In Windows 8
Windows provides you with a preset list of standard screen resolutions for your display based on your graphics carte or GPU and monitor hardware. You tin hands change the screen resolution of of your display by switching to whatever of the presets provided by Windows. But what if you want to you a screen resolution that isn't included in what has been given you?
Custom resolutions give yous the flexibility to add nearly any screen resolution and refresh charge per unit for your display. If you want to use a unique resolution that isn't available in Windows preset list of resolutions, this guide will show yous ways you tin can add whatsoever mode.
Note that non all computer manufacturers take custom modes enabled for their drivers, and older graphic drivers may not enable this feature. In this article, I'll show y'all how to change your screen resolution on Intel, AMD or NVIDIA graphics menu using their native control software or a 3rd party software for those who don't even so don't have the power to customize their screen resolutions.
Method 1: Setting a Custom Resolution on an Intel Based Graphics Menu
Before you go along, you need to check if your estimator supports the custom graphics characteristic. This is described in the first three steps of this method. If yous don't meet this criteria, go on to the 3rd method. The views might besides be different on your estimator, but follow closely and you'll get it.
- Verify from here if you have the latest Intel Graphics Driver
- Open the Intel Graphics Driver properties windows by pressing Ctrl + Alt + F12 or right-clicking on the Windows desktop and selecting Graphics If prompted to select an application mode, select Advanced Mode and click OK.
- Under the Brandish tab, check if there is Custom Resolutions/Custom Modes and select information technology. If you're prompted with a warning, click yes to continue.
The Custom Resolution/Modes feature was removed from the Intel Hard disk drive Graphics Command Console. You can still access it from C:\Windows\System32\CustomModeApp.exe
- Nether "Bones Settings", specify your preferred width, height and refresh rate in the boxes provided (east.g. 2400 x 1024).
- Click on Add and and then Yes when prompted with a confirmation dialog.
- Click OK if y'all're satisfied with the current resolution. To remove the custom resolution, click on Remove next to the custom resolution under "Remove Custom Resolution".
Method 2: Setting a Custom Resolution on a NVIDIA Based Graphics Card
This method may vary with the version of graphics driver and graphics card but the concept remains the same. Besides, make sure you have the latest NVIDIA Graphics Drivers.
- Get to the NVIDIA Display Properties past right-clicking on the Windows desktop on selecting NVIDIA Brandish.
- Under the Brandish category, select Modify Resolution. Select the icon which represents the display you wish to affect and and then click Customize. On the next window, click Create Custom Resolution. If this is the beginning time, accessing this feature, you will have to have the End User Licence Understanding.
- Make full in the fields with your preferred values for the display. Here, you can change the Horizontal pixels (width), Vertical lines (height), Refresh rate, Color depth, and Browse blazon. Click the Test push for the display to cheque of the custom way is supported. If it doesn't test will fail and you cannot prepare a new custom resolution.
- You can go dorsum to the Alter Resolution folio to select from your custom resolutions.
Method 3: Setting a Custom Resolution on an AMD Based Graphics Carte du jour
- Right-click on your Windows desktop and select AMD Catalyst Command Centre. Go to Information > Software. Copy the 2nd commuter file path, you will need it later on.
- Press Ctrl + R, type "regedit" and click OK.
- Go to the registry path as specified in the 2D driver file path
- In the "0000" folder, observe a registry entry called DALNonStandardModesBCD1. Correct-click and select edit and and so enter the following values in lodge:
- The width of the resolution. E.g 1440 or 0780
- The pinnacle of the resolution. Eg. 1880 or 0240
- Type iv zeros
- The refresh rate of your monitor. Eastward.yard. 0120 for 120Hz or 0060 for 60Hz.
If whatsoever of your values does not have up four digits, yous have to proceed the values with 0.
- Click on OK and restart your computer. After this, yous should exist able to choose your custom resolution from the AMD Goad Control Heart.
Method 4: Setting a Custom Resolution Using a Custom Software
This method works PC's running Windows Vista to a higher place with AMD/ATI or NVIDIA graphics carte. Intel GPUs and laptops are partially supported with this test driver: https://downloadcenter.intel.com/downloa…est-Commuter)
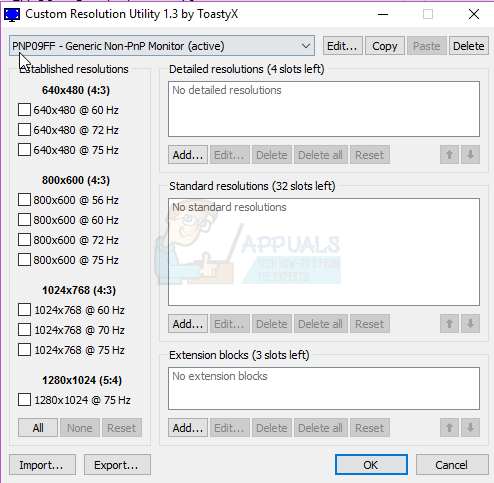
- Download the Custom Resolution Utility (CRU) and extract the zip.
- Run CRU.exe
- Choose your display from the drop-down list at the top of the window.
- Under "Standard Resolutions", click on Add.
- A "Standard Resolution" window will appear with a preset resolution. Click on it and select Custom Resolution at the lesser of the list. Enter the width, the height and the refresh rate of the screen in the available fields and click
- In the CRU folder, run restart.exe or restart64.exe for 64 bit systems to restart the graphics commuter.
- Set the custom resolution from the brandish settings for your computer.
![]()
Source: https://appuals.com/how-to-create-custom-resolutions-on-windows-7-8-or-10/
Posted by: stephensarly1995.blogspot.com
0 Response to "How To Change Resolution In Windows 8"
Post a Comment